WordPress Tutorial
How To Create Ecommerce Website: Ultimate Guide
Today internet has 10+Million eCommerce website. More than 10 million websites built with WordPress. Why WordPress and why should you create an eCommerce website with wordpress? To answer all this, keep reading this ultimate guide of an Ecommerce website.
Table of Contents
Why should you have an eCommerce website?
Whether you are interested in starting a new online business or you want to expend your existing business online. An eCommerce website can be the most profitable venture for your business. It does not matter Whether you have a small shop or even if you have a big store. You can take your business online.
Why WordPress for Ecommerce Wesbite?
I will not go with technical stuff. WordPress is a free and open-source content management system. You can create your Website with WordPress without knowing to code. WordPress is the Best Platform for eCommerce website, blog or any website with WordPress as you want your website to be like.
Requirements To Create Ecommerce Website
- Hosting
- Domain name
- WordPress Theme
- SSL cretificate
Hosting
Hosting is your online space, where all your website files store without hosting your brand name useless. In this Guide, we will use WordPress hosting. With GoDaddy's WordPress hosting, you will get a free domain as well. You do not need to buy a domain separately.
Domain Name
The domain name is your website name. It is your brand name. below
Amazon.com, Wikipedia.com, google.com, YouTube.com
WordPress Theme
WordPress theme plays a vital role in an eCommerce website. Why? because If website design looks attractive, the conversion rate will be high. (however, there are other strategies to increase conversion rate which we will not talk in this Guide). “The7” is the best selling WordPress theme in 2020. It has 213K sale. It comes with top premium plugins. You can get “The7” theme below. The paid theme is optional; you can start your eCommerce website with the free theme as well.
The SSL certificate For eCommerce website
The SSL stands for secure socket layer. SSL certificate is very impotent for eCommerce website because your client sensitive information like a credit card, debit card and net-banking will be safe with SSL certificate. You e-commerce website visitor will trust on your site. That is why you should have an SSL certificate on your site. You can install a free SSL certificate by watch this video.
Hindi version below 👇
A Step By Step Ultimate Guide For Create Ecommerce Website
You can jump to any part of this guide by clicking on steps below.👇
- Step 1: Get WordPress hosting & Domain
- Step 2: Install WordPress
- Step 3: Connect your domain name
- Step 4: Install Theme
- Step 5: Set up your eCommerce website
- Step 6: Submit your Website to Google search console
Step #1: Get WordPress hosting & domain
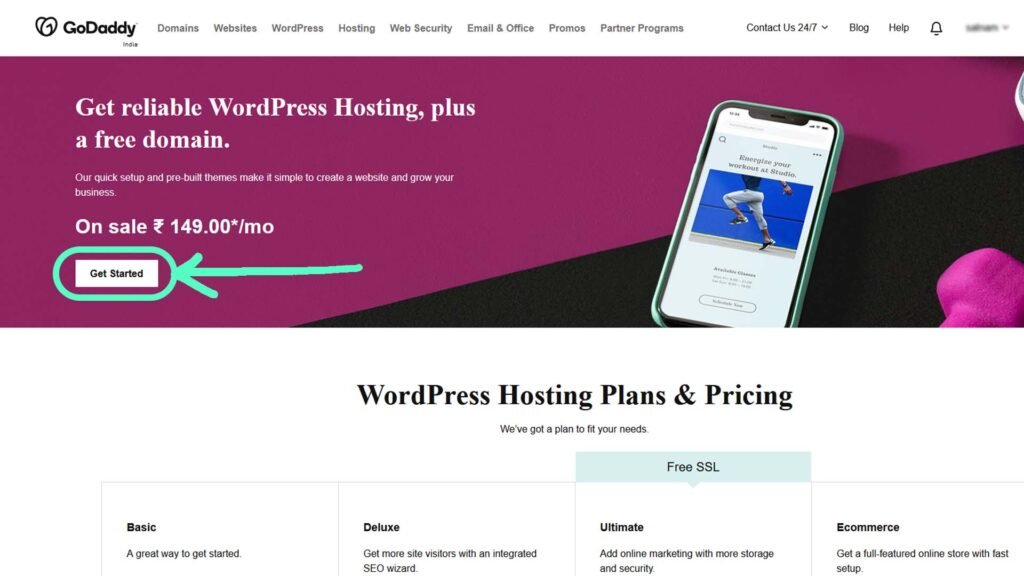
The first thing you need to do is Open Godaddy website. Click on Get started as I've highlighted in the screenshot below.
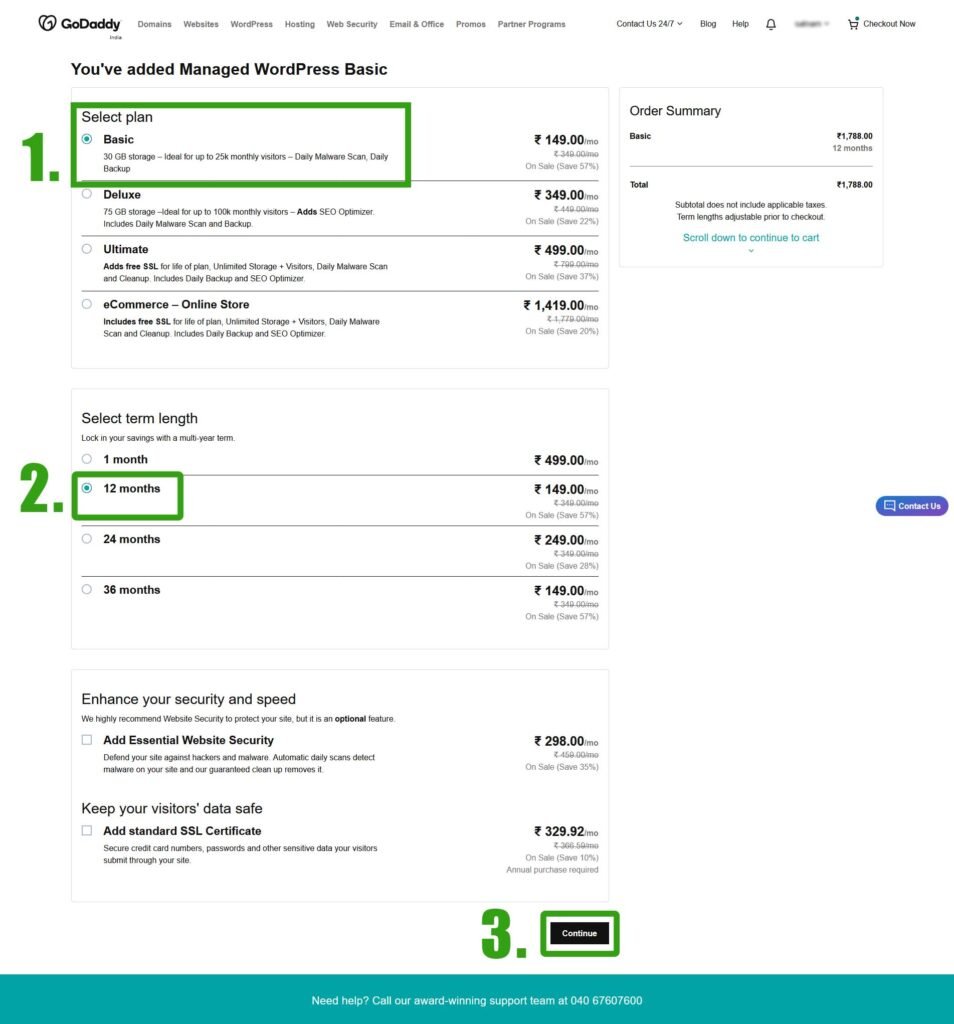
Select the Basic plan. Chose 12 month time period and click on continue. With a Basic plan and you will get a free domain as well. Check the screenshot below.
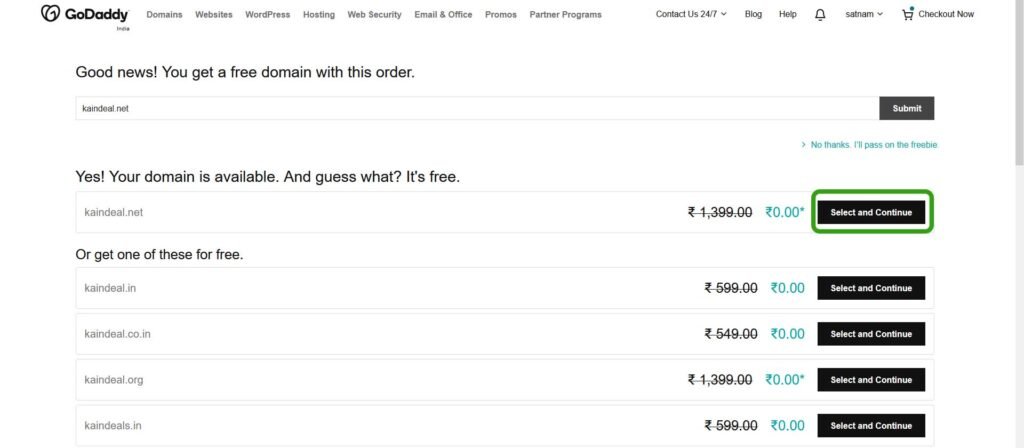
In the next page search your domain name

Now click on Select and continue.👇
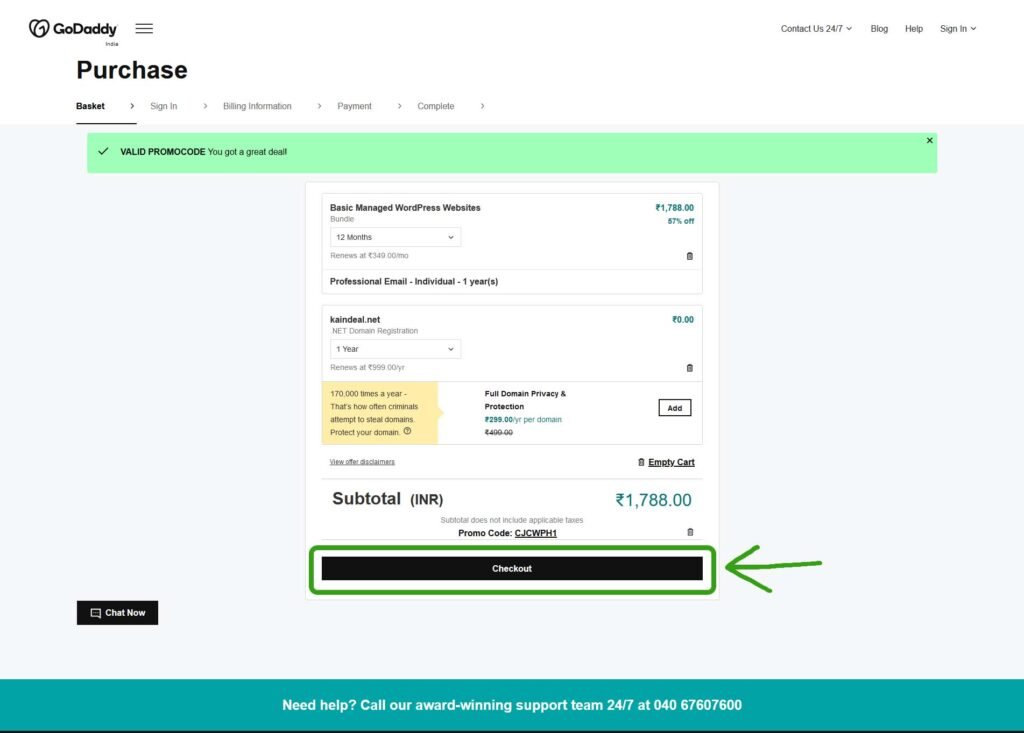
Click on Checkout. As I have highlighted on the screenshot👇
In this page you can Create Account or sign in. use the social icon for sign up.
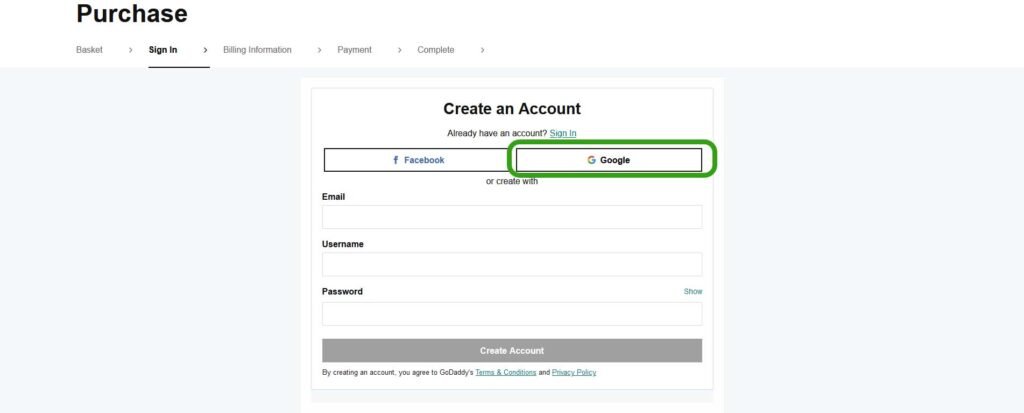
Creating an account of Godaddy is about as easy as it gets—10 seconds max. You'll only need to provide an email, username and password to continue.
Now fill out your billing information and click save.
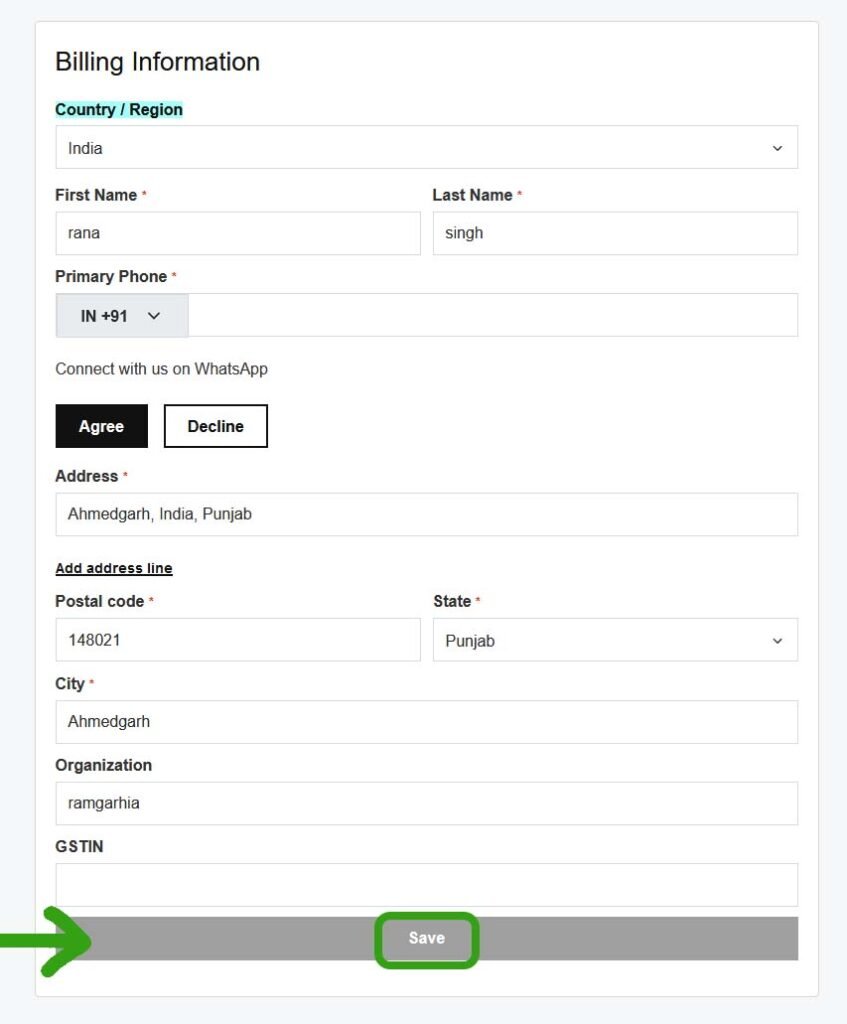
After typing your billing detail, proceed with the payment process and complete your payment.
Step #2: Install WordPress
In our second step, we will install WordPress. Now click on Add Site.
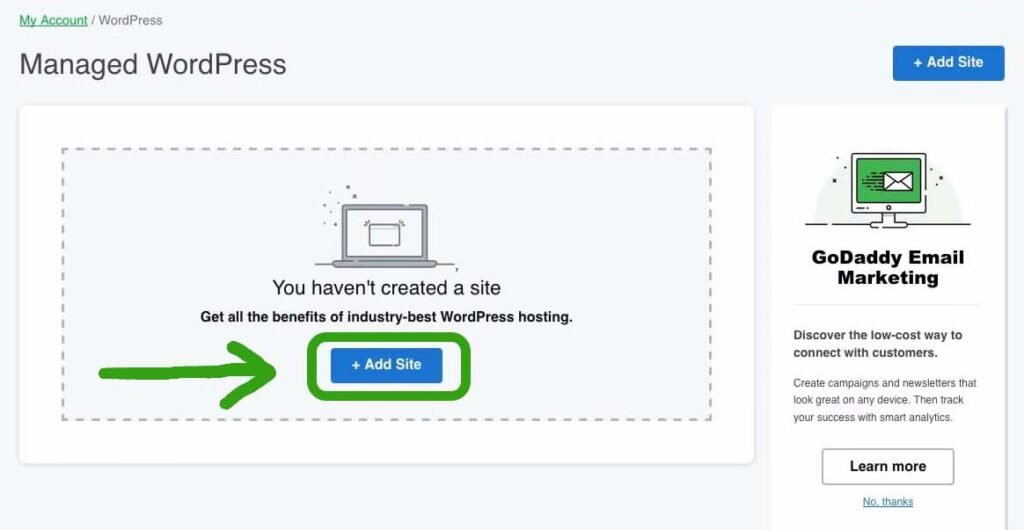
Create your WordPress username and Password. And click on Add.

Now, your site will be set up on temporary domain.
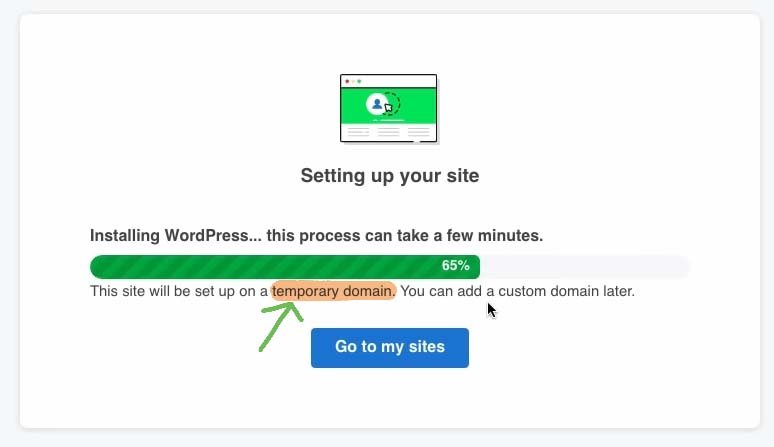
Open the WordPress dashboard by clicking on WP Admin.

Step #3: Connect your domain name
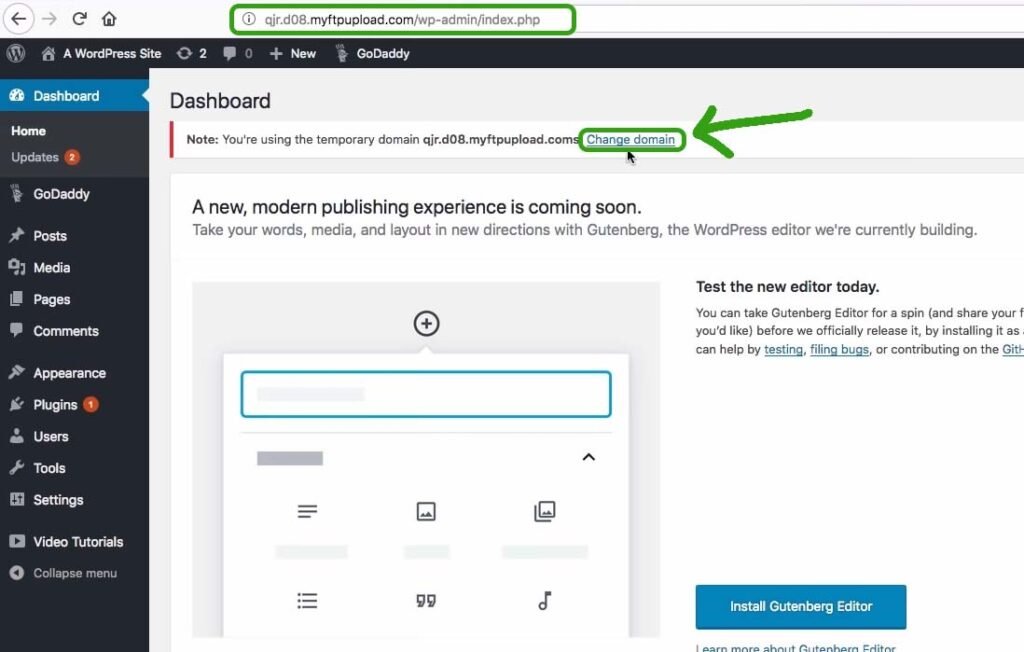
By default your custom domain not set up. To connect your custom domain, click on Change domain. check out the below screenshot👇
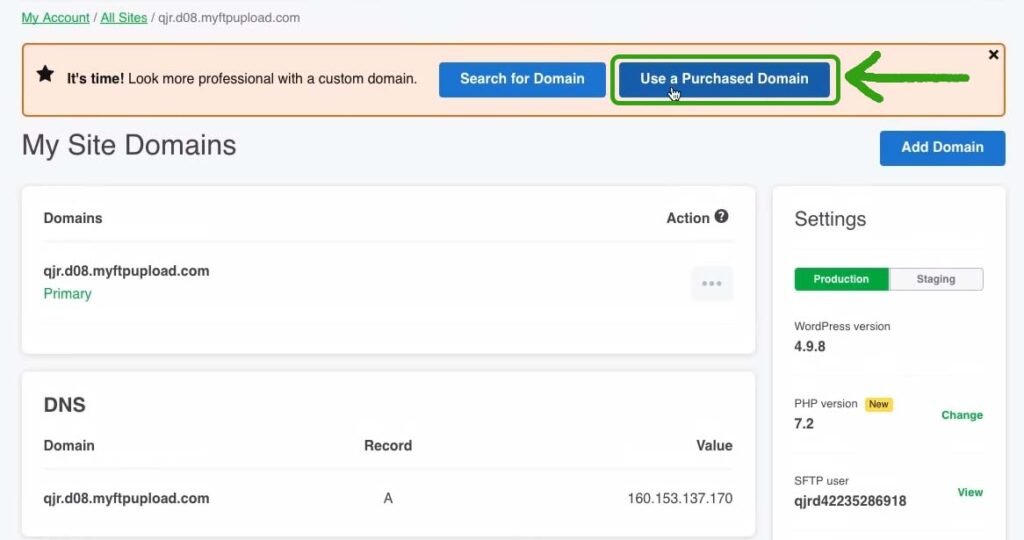
Next, click on Use a Purchased Domain.
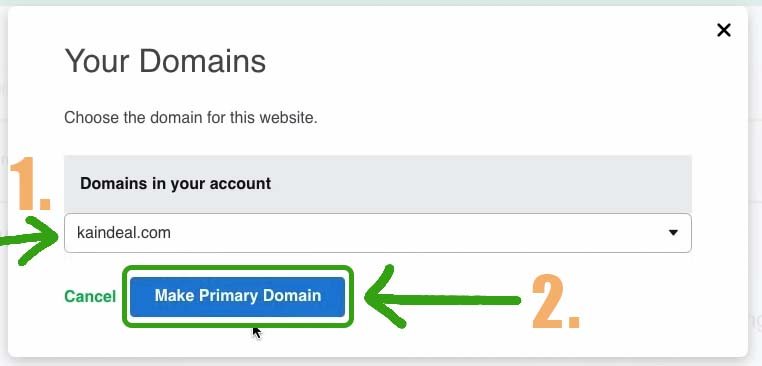
Select your domain, and click on Make Primary Domain.👇
Step #4: Install Theme
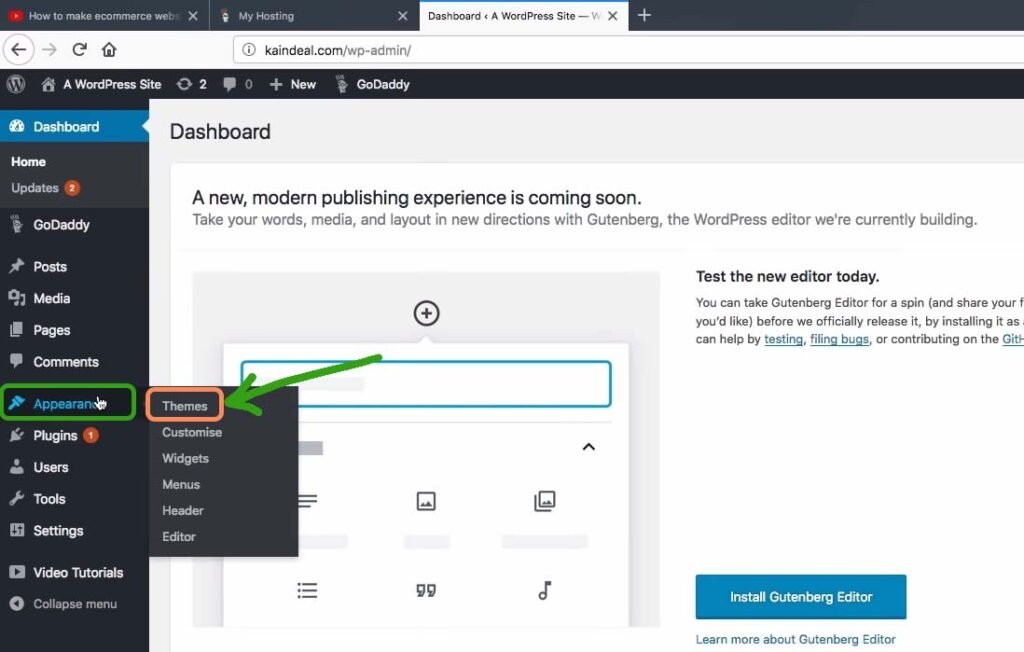
In your WordPress dashboard, Hover you mouse over Appearance and click on Themes.
Now click on Add New.

Search for Astra theme. Install and Activate it if you have bought premium theme like The7 theme. You can install it by click on Upload Theme button.

After Activating Astra theme, we have to install the Astra Plugin. check out the screenshot below👇

Now search Astra Plugin and install & Activate it.

Let's install demo content with the pre-build theme. Installing demo content make it easy to set up our eCommerce website.
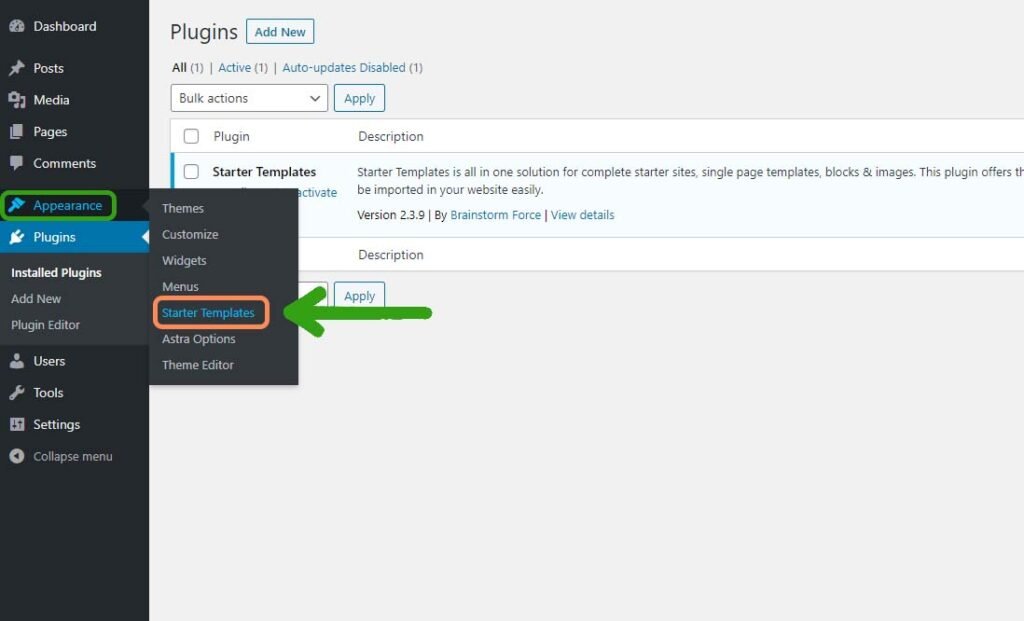
Hover you mouse over Appearance and click on Starter Templates.
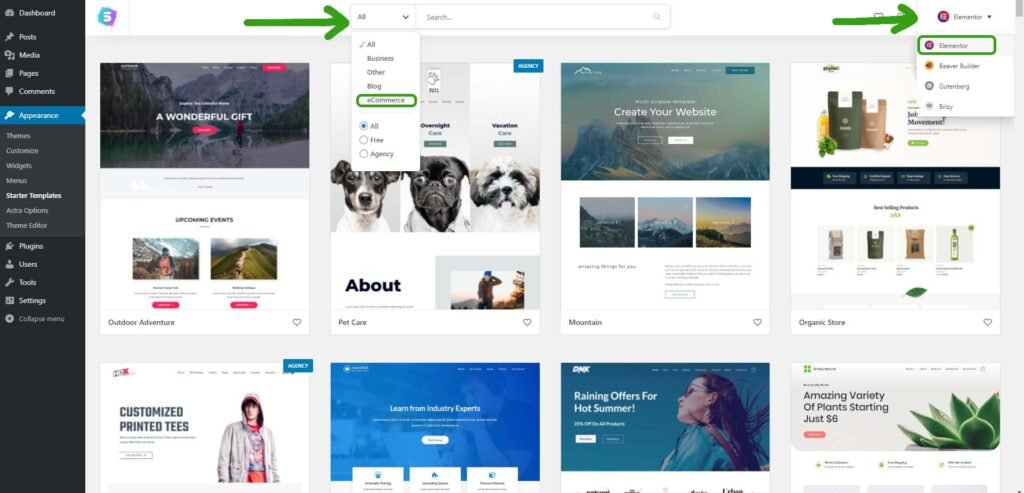
Select Elementor page builder and click on eCommerce from the drop-down menu, as I’ve highlighted in the screenshot below.👇
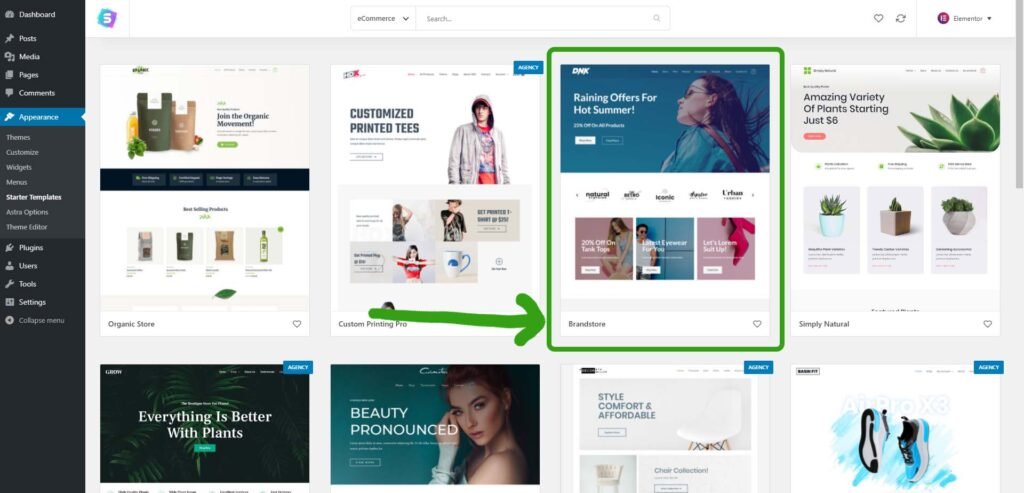
Select Branstrom theme because it is a free theme. However, you can install any of theme.
Note: some of Astra theme is free, and some are paid.
Next, Click on import complete site.
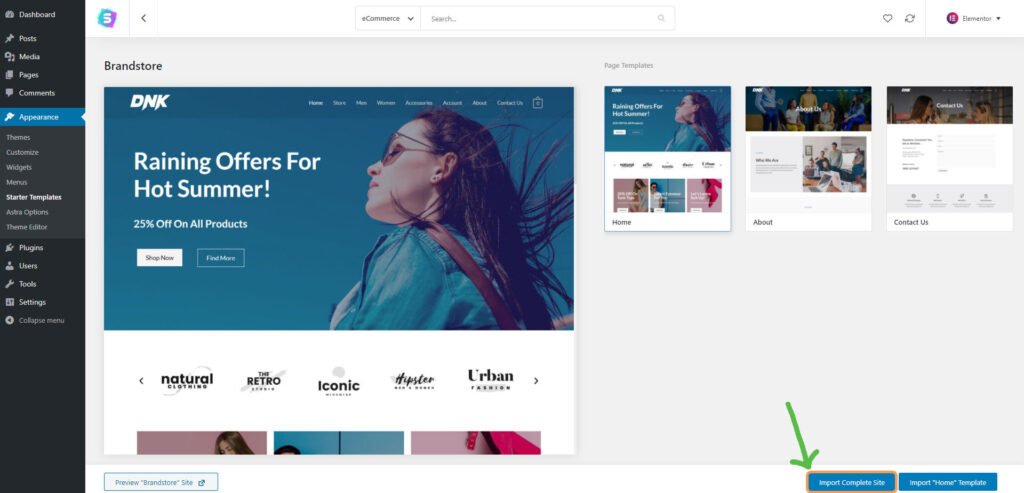
Now click on Import.
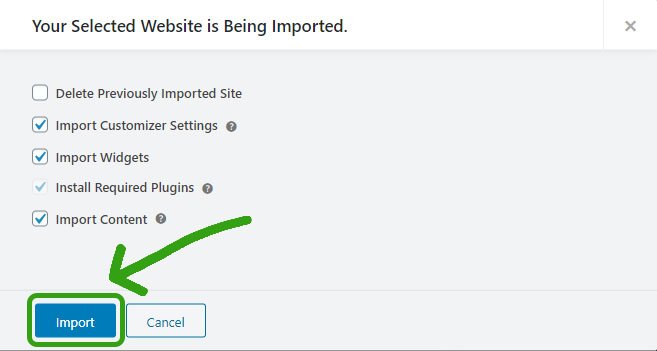
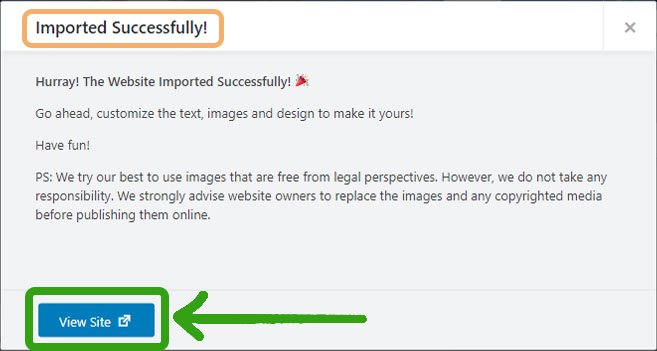
Now you see import successfully message. click on view site.
If any case you are facing error like “import fail” or any plugin error.
Watch this video to fix your problem.👇
Step #5: Set up your ecommerce website
After importing demo theme, you can customize your website. You need to set up the eCommerce website. I'll give you a quick overview of how you can setup your eCommerce website.
- Add products
- Set up WooCommerce Plugin.
- Add payment methods
Add Products
To add a product, navigate to the Products » Add New.
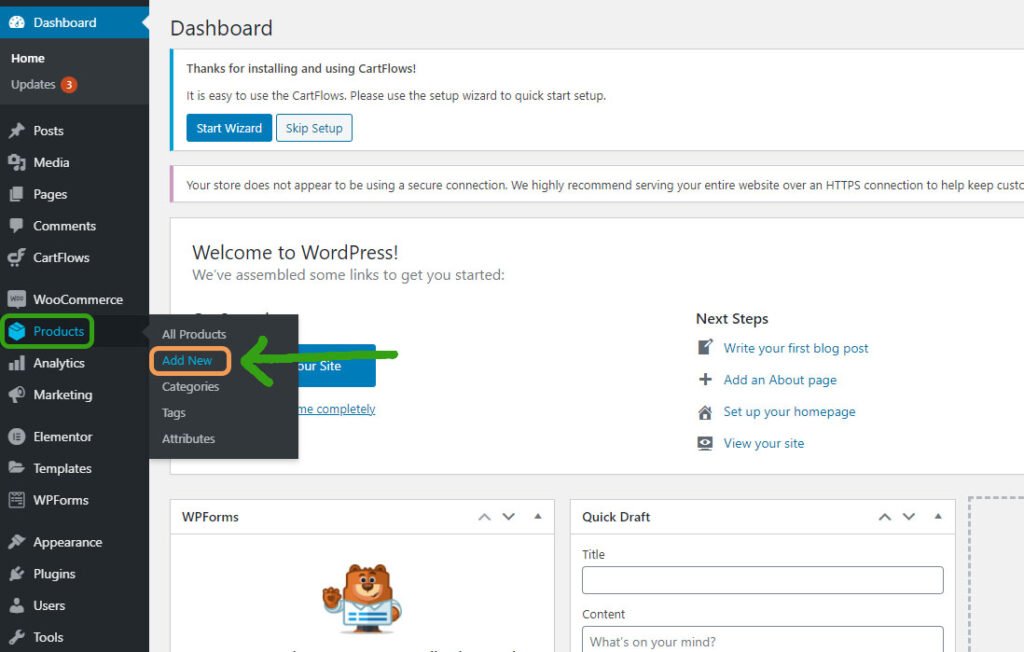
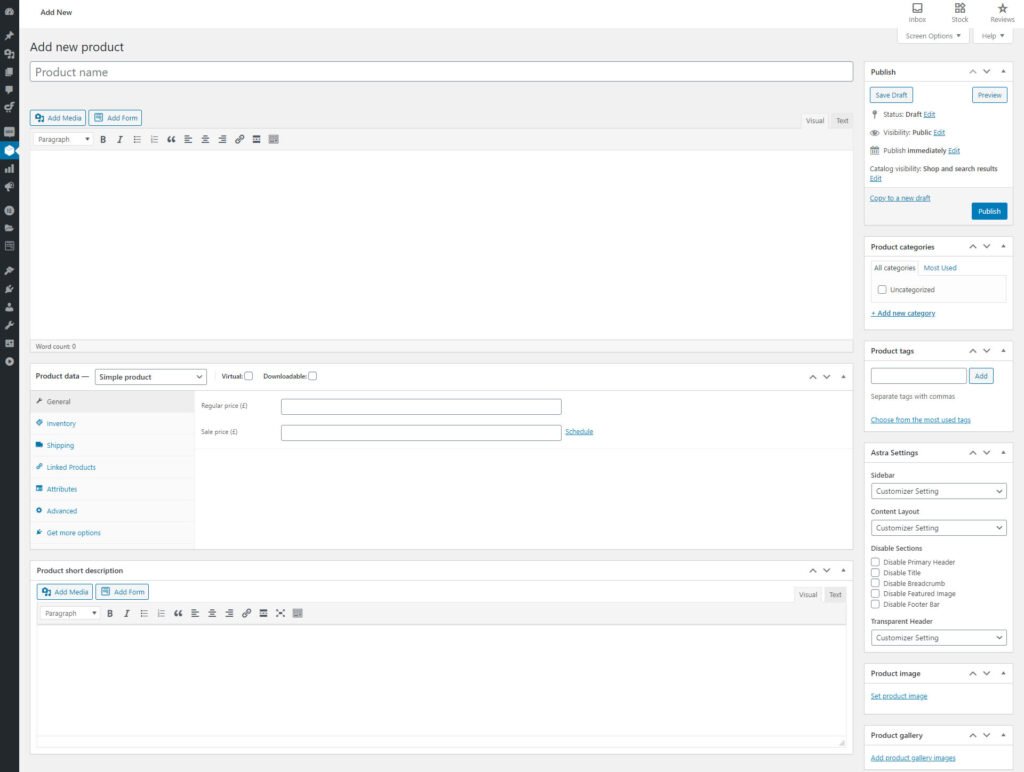
From here, you’ll be able to name the product, set the price, and write your product description. You can add product images.
You can also control the product size options, color choices and inventory.
Set up WooCommerce Plugin.
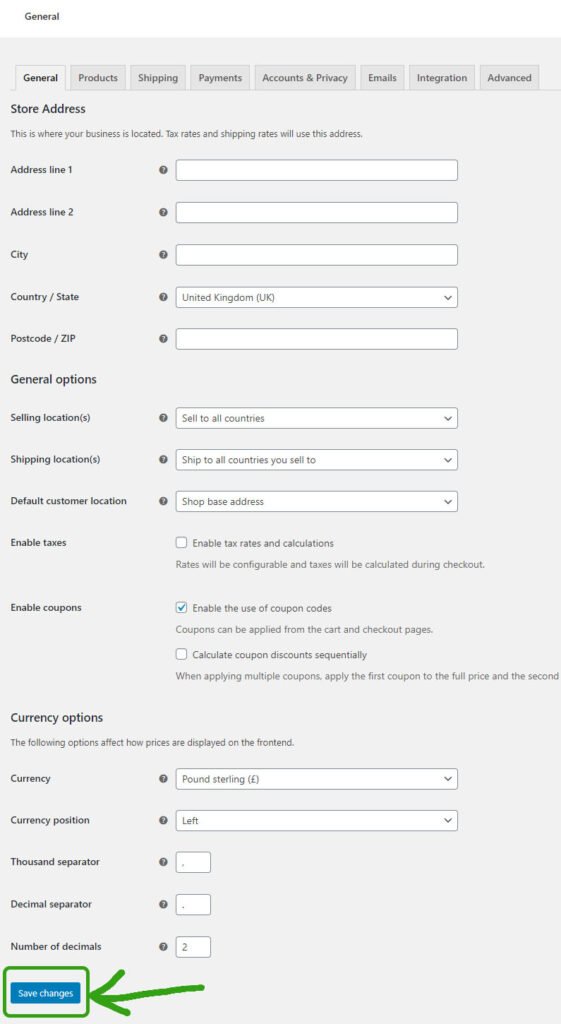
Navigate to the WooCommerce » Settings.
Here You can setup your WooCommerce Plugin. You’ll also be able to add your store address, shipping method and Product type etc.
Add payment methods
Go to WooCommerce » Settings.
Under the payment tab, you can enable PayPal and click on setup. There you have to type your PayPal email add PayPal API credentials.
Live API Username, API password and Live API signature.
You can find your PayPal API credentials here.

If you want to learn more about WordPress customization? You can check out this video.👇
Step #6: Submit your Website to Google search console
Now you have created your site. Now you need to submit your eCommerce website on google search console. By doing that your site can appear on the Google search result.
Here is a video for you. How to submit your website to google search console?
Conclusion
To create an eCommerce website isn’t that complicated. You can build your site under 30 Minutes if your beginner.
While it will take you longer than that to add your items, compose item descriptions, upload pictures, and everything else that goes into having a profitable eCommerce website.
At least you can create your eCommerce website by watching this video.
I hope you find this eCommerce Guide useful. If so you can subscribe to our newsletter below.


Pingback: Sellvia Review: Everything You Need To Know [Pros and Cons]